How to use the Magic Plant Growing Kit to Grow Your Own Chili Peppers
Growing your own chili peppers can be fun and rewarding. One of the easiest ways to accomplish this goal is to use the Magic Plant all-inclusive-growing-kit. Inside you’ll find everything needed to grow a pepper plant except water, nutrition and sunshine. The Magic Plant pepper kit was designed to make it easy for individuals to grow and enjoy their own tasty peppers. The directions are easy to follow and soon you’ll be enjoying chili peppers all year long
Basic Steps for Growing your Magic Plant Chili Peppers
1. In the bottom of the can, you will find the basic instructions for opening the can and watering your plants.
2. Be sure to follow the directions for watering your plant very carefully. Overwatering especially during germination, can kill the seeds or cause them to develop fungal diseases.
3. Before re-watering the plant, always allow the surface of the soil to dry slightly. If you do accidentally over water the plant, take the plastic cap off the bottom of the can so that any extra water can be released. Then let the can drain completely so that there is no water dripping from the can’s bottom.
4. Seeds need optimal temperature and perfect conditions in order to germinate, but they do not have to have light.
5. The .soil temperature should be between 75 and 90 degrees (F) for germination to occur. The warmest spot in your home will be the best location for the growing kit. You can use a window sill, but the winter months can cause the container to become too cool, especially if the sunshine is unable to warm the area. A heating pad is one alternative used for keeping the seeds at a warm enough temperature to germinate. Just remember that if you use the heating pad, the soil will tend to dry out more quickly than at room temperature. Do not allow the temperature of the soil to fall below 60 Degrees (F) or germination may be delayed
6. You should begin to see seedlings emerging in as little as 8 to 10 days.
7. Once the seedlings have broken through the top of the soil, they will need sunlight. If the plant is kept by a window, it should be on the southern side of the home. Alternatively, you may choose a window that receives the most amount of sunlight throughout the daytime hours. Make sure to rotate the plant so that it will have even sun exposure. This keeps it from leaning toward one side or becoming too leggy. Maintain a warm and moist environment for your magic plant so that it will be healthy and continue to produce hot peppers for you to enjoy.
Why Choose the Magic Plant Way to Grow Peppers?
The pepper seeds in the magic plant kit are packaged in an attractive can which includes the perfect soil for its growth. Chili peppers need a well maintained environment to grow and the Magic Plant helps provide the perfect elements like sandy soil. The Magic Plant is a great way to grow peppers for several reasons but the top three reasons why this kit is perfect include:
- The soil in the Magic Plant kit is specially designed to retain moisture without a bottom retention if the can is left uncapped. The special soil ensures a successful growing process since chili peppers do not grow well when the soil is waterlogged.
- The aluminum container the Magic Plant comes in is conveniently sized which makes it easy to move the plant to the sunniest locations in your home or to transplant it when you are ready.
- The aluminum can is easy to warm and cool so you can use an alternative heating source if you prefer.
Now that you understand what is needed for the chili pepper to get a good start, it’s time to move on to the next steps. Please note that the seedlings do not require sunlight just to sprout, they only need warmth and moisture to germinate and start sprouting. They will begin to emerge and be visible in about 8 to 10 days as long as the temperature is kept between 75 and 95 degrees. If the temperature is not kept within this range, it can take a little longer for them to sprout. At normal room temperatures of 72 degrees, it may take up to 40 days for the peppers to sprout. After the seedlings begin to break through the top of the soil, they will require sunlight and/or an indoor light of some sort. If they do not have a direct source of light, they will not be able to thrive and will begin to wilt. During this growing stage it is essential to maintain a temperature between 75 and 95 degrees continuously. Should the seedlings begin to appear droopy or like they are wilting, then you should mix one teaspoon of Epsom Salt and eight ounces of distilled water in a spray bottle. Shake it up to ensure the Epsom Salt dissolves completely and then spray two pumps of water from the sprayer onto the soil. This will provide the magnesium needed for proper development. After the seedlings are 3.5 to 4 inches tall, you should be able to notice a very small bud in the center of the plant. To stimulate growth, snip the bud off.
You will need to feed your chili pepper plant on a regular basis. Fish emulsion can be bought at your local hardware store or garden center. Follow the directions on the label of the product you purchase.
Indoor Transplanting of Chili Peppers
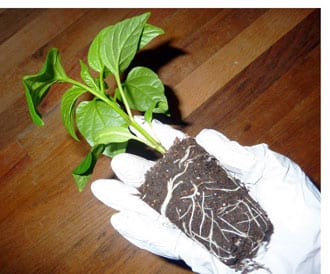
Once the bud is snipped off of the chili pepper plant it will usually grow very well. Once it reaches about 6 to 6.5 inches tall it can be replanted into an indoor pot. This is actually a very good idea since it can become root bound in the smaller container. Removing it before it has a chance to become root bound will be good for the plant so that the roots are disturbed less in the process. This can lessen the shock the plant endures. A 2-gallon container is a good size since it will allow enough room for growth but it is still small enough to be portable if you need to move it.
For transplanting you can use different soils, but mixing 70% silt loam to 30% Miracle-Grow Potting soil works well. Silt loam is composed of silt, sand and organic matter; and Miracle Grow has nutrients which will help the plant remain healthy and grow.
 Once the soil is mixed and in the pot, you can sprinkle a couple tablespoons of Epsom salt on the top of the soil and then mix it in. The magnesium in Epsom Salt can help encourage the development of the chili pepper plant.
Once you have the pot and soil ready you can transplant the pepper plant. Use the Magic Plant container to press out a hole in the new soil. Pressing it down you can create a hole that is about 1.5 inches deep. Then gently remove the pepper plant from the container and be careful to refrain from damaging the roots. Put the plant down into the hole you created and use soil to fill in the hole around the roots. After the hole is filled in press gently on the soil around the base of the plant. It’s okay to bury the stem past the root since pepper plants will root from the stem. Go ahead and carefully water the transplanted plant around the outer edges of the new pot. This will prevent disturbing the roots. Only water the plant when the surface of the soil is dry to the touch. Place the plant where it can receive direct sunlight and remember to frequently rotate the pot
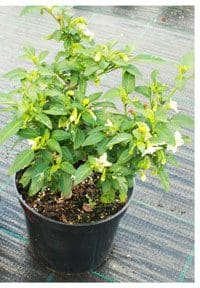
A healthy chili pepper plant will have dark green leaves and stems. If they become lighter green you may need to feed the plant or find another source of light which is adequate. Once the chili pepper begins to bud and flowers blossom, you’ll need to hand pollinate it so that it will continue to produce delicious peppers.
 How to Hand Pollinate Chili Peppers
It is extremely convenient to grow pepper plants in a can the Magic Plant way! It makes a great gift and it is something anyone can enjoy.
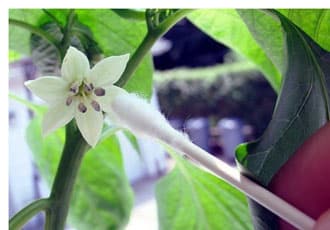
Once the blossoms have fully developed and are open you should be able to see the pollen sacs. At this time it is ready to be pollinated. Outdoors, insects would do the pollinating, but you can pollinate it if it is being grown inside. The stamen produces the pollen. This is the male reproductive organ of the flower and it is the most potent each day between noon and 3 p.m. There has to be more than one flower present in order to pollinate the plant. All you need is a small, very thin, moistened paintbrush. Gently dab the stamen with the paintbrush so that pollen gets on the brush and then insert the brush into the center of the other flowers. It is suggested that you pollinate a few times over several days in order to improve the odds of a successful pollination.
 How to Transplant your Chili Pepper Outdoors
Here are the two basics to remember when growing your own chili peppers:
- Moisture and warmth are essential
- Do not overwater the chili pepper
What if you want to move your chili pepper plant outdoors instead of indoors? The first considerations are the outdoor temperature, soil prep and location. After the temperature stays above 60 degrees on a consistent basis you can transplant it outdoors. Carefully choose where you will plant the pepper plant outdoors. You may want to put it in a raised bed or in a large container. Just make sure to create the perfect soil for the pepper to thrive. It also has to be in a location where there is lots of sunlight. Pepper plants prefer to be in well drained, but moist soil. This means you may need to dig a hole that is larger than normal to create the perfect soil for the plant. Some pepper plants can get as big as 5 feet wide and 5 feet tall so make sure to plant it where it has plenty of growing room.
If you live in an area where the soil is sandy you may only need to mix some miracle grow with it, along with some Epsom Salt. If your soil is not sandy, you may need to buy the right types of soil to mix together to create the best soil for the pepper plant. Once it is mixed well, you are ready to replant your pepper plant. Make sure that you start earlier putting the pepper outside for varying periods of time to allow it to become acclimated to the new environment. This helps keep it from being shocked when you just put it outside. Once it has acclimated to the outdoors and you are ready, plant it in the soil you prepared for it. Then you can moisten it lightly.
We hope you enjoy growing your pepper plants the Magic Plant way.

 How to Hand Pollinate Chili Peppers
 How to Transplant your Chili Pepper Outdoors